
Unimus Core HA deploy - a how-to guide
In this article we setup a highly-available Unimus Core pair in a 2 node cluster using Corosync and Pacemaker.

We often get asked how to deploy the Unimus Core in a high availability scenario. While Unimus can natively handle multiple Cores attempting to connect and become the active poller for a single Zone by dropping an incoming Core connection if another Core is already active, this is not an ideal solution in large-scale deploys. In this article we will explore setting up a clustered Unimus Core deploy using Corosync and Pacemaker.
Here is a high-level diagram of how our example setup looks like:
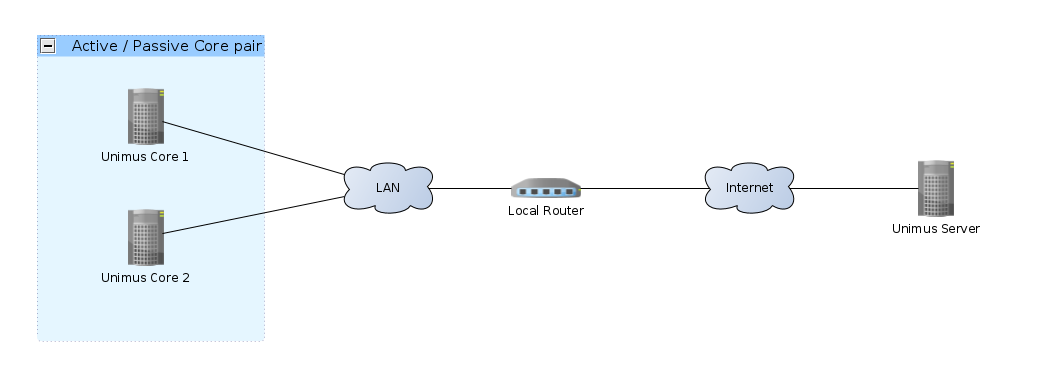
Using clustering, only one of the Cores will ever be active - this is an active / passive HA scenario. If the active Core fails for any reasons, Pacemaker will failover the service to another available cluster member.
For the sake of simplicity we will be deploying a 2-node cluster in this example.
Components of the cluster
Components of our clustering solution:
- Linux - our base operating system that our cluster nodes run.
- Corosync - Provides cluster node membership and status information. Notifies of nodes joining/leaving cluster and provides quorum.
- Pacemaker - Cluster resource manager (CRM). Uses the information from Corosync to manage cluster resources and their availability.
pcs- A helper utility that interfaces with Corosync (corosync.conf) and Pacemaker (cib.xml) to manage a cluster.- Unimus Core - Our service we want to have highly available.
We will use pcs to manage the cluster. pcs is a cluster manager helper that we can use as a single frontend for the setup and management of our cluster. Without pcs you would need to setup Corosync manually through the corosync.conf config file, and manage Pacemaker configuration through its crm utility.
Deploying Corosync / Pacemaker without pcs is absolutely possible, but for the sake of simplicity we will rely on pcs to setup Corosyn and Pacemaker for us.
Preparations
The example commands below were tested on Ubuntu 18, but the setup should be very similar on any other Linux distro. We assume you are starting with a clean Linux system. As such, we need to prepare both our cluster members by running these commands:
# run everything as root
sudo su

# update
apt-get update && apt-get upgrade -y

# install dependencies
apt-get install -y \
  wget \
  curl \
  corosync \
  pacemaker \
  pcs

# install Unimus Core in unattended mode
wget https://unimus.net/install-unimus-core.sh && \
  chmod +x install-unimus-core.sh && \
  ./install-unimus-core.sh -u

# setup Unimus Core config file
cat <<- "EOF" > /etc/unimus-core/unimus-core.properties
  unimus.address = your_server_address_here
  unimus.port = 5509
  unimus.access.key = your_access_key
  logging.file.count = 9
  logging.file.size = 50
EOF
Next up, we need to setup a single user that will be the same across all cluster nodes. This user will be used by pcs to kickstart our cluster setup. pcs already creates a hacluster user during its installation, so we will just change that user's credentials:
CLUSTER_PWD="please_insert_strong_password_here"
echo "hacluster:$CLUSTER_PWD" | chpasswd
After we have a common user across our cluster nodes, pick one node from which we will control the cluster. We can run these commands to setup the cluster:
CLUSTER_PWD="please_insert_strong_password_here"

# setup cluster
pcs cluster auth test-core1.net.internal test-core2.net.internal -u hacluster -p "$CLUSTER_PWD" --force
pcs cluster setup --name unimus_core_cluster test-core1.net.internal test-core2.net.internal --force

# start cluster
pcs cluster enable --all
pcs cluster start --all
Since we are using a 2-node cluster in this example, we need to set a few other specific properties. First, we disable quorum, as achieving a quorum with 2 nodes is impossible. We also disable fencing.
pcs property set no-quorum-policy=ignore
pcs property set stonith-enabled=false
Our cluster setup should now be done, so lets check our cluster status:
pcs property list
pcs status
You should see both your cluster nodes online, like this:
root@test-core1:~# pcs status
Cluster name: unimus_core_cluster
Stack: corosync
Current DC: test-core1 (version 1.1.18-2b07d5c5a9) - partition with quorum
Last updated: Tue Mar  4 01:08:51 2022
Last change: Tue Mar  4 01:04:49 2022 by hacluster via crmd on test-core1

2 nodes configured
0 resources configured

Online: [ test-core1 test-core2 ]

No resources


Daemon Status:
  corosync: active/enabled
  pacemaker: active/enabled
  pcsd: active/enabled
root@test-core1:~#
Troubleshooting
If you don't see your cluster members online, or pcs status complains about some issues, here are a few common pitfalls:
- Your cluster nodes should NOT be behind NAT (this is possible, but requires more config not covered in this guide).
- You must use hostnames / FQDNs for cluster nodes. Using IPs is a no-go. If needed, create hostnames for cluster nodes in
/etc/hosts. - The hostname / FQDN you used resolves to
127.0.0.1, or a different loopback. This is also a no-go as Corosync / Pacemaker require that the hostnames / FQDNs used for clustering resolve to actual cluster member IPs.
In general, most of these issues can be resolved by proper DNS setup, or by creating proper records in /etc/hosts.
Creating a cluster resource
Now that our cluster is up, we can tell Pacemaker to start managing the Unimus Core service as a clustered service.
First we however need to disable Unimus Core from starting automatically at system startup on each node:
# disable Core autostart, Pacemaker will control this
systemctl stop unimus-core
systemctl disable unimus-core
Then we can create our cluster resource through pcs on one of our cluster nodes:
# we might want to set node as ineligible to run the service if it fails to start
pcs resource defaults migration-threshold=1

# setup our cluster resource
pcs resource create unimus_core systemd:unimus-core op start timeout="30s" op monitor interval="10s"
You will notice we use systemctl, and also declared the cluster resource using the systemd resource agent. We do this because Ubuntu 18 (which we are showcasing this setup on) uses systemd. If you are running a distro which doesn't use systemd as its init system, you will need to do things differently.
We recommend checking out Pacemaker documentation on available resource agents and how to use them.
Monitoring cluster resources
Now that our cluster resource is created, lets check if it works:
pcs status resourcesYou should see that the Core is running on one of the nodes. Here is how our output looks:
root@test-core1:~# pcs status resources
 unimus_core	(systemd:unimus-core):	Started test-core1
root@test-core1:~#
You can also check the status of the unimus-core service on both of your cluster nodes:
# on core1
root@test-core1:~# systemctl status unimus-core
● unimus-core.service - Cluster Controlled unimus-core
   Loaded: loaded (/etc/systemd/system/unimus-core.service; disabled; vendor preset: enabled)
  Drop-In: /run/systemd/system/unimus-core.service.d
           └─50-pacemaker.conf
   Active: active (running)
...
root@test-core1:~#

# on core2
root@test-core2:~# systemctl status unimus-core
● unimus-core.service - Unimus Remote Core
   Loaded: loaded (/etc/systemd/system/unimus-core.service; disabled; vendor preset: enabled)
   Active: inactive (dead)
root@test-core2:~#
You should also see the Core connect to your Unimus server, and the Zone should be ONLINE.
Live monitoring of cluster status
To monitor the cluster status live, you can run the crm_mon in the live / interactive mode (just run the crm_mon command) and see the Core service fail over to a 2nd node on failure.
Simulating a failure
You can easily simulate a failure in many ways. You can reboot one of your cluster members, and you should see the failover occur. You should also see the Zone briefly go OFFLINE in Unimus and then back ONLINE. You can also simulate a failure on one of the cluster nodes by running:
crm_resource --resource unimus_core --force-stopYou should see that Core started on the other node:
root@test-core1:~# pcs status resources
 unimus_core	(systemd:unimus-core):	Started test-core2
root@test-core1:~#
For the original node (test-core1 in our case) to be considered as a viable node to run our resource, we need to run:
pcs resource cleanup unimus-coreIf you want to migrate the service back to the first node, you can run:
# force a move to another cluster member
crm_resource --resource unimus_core --move

# clear any resource constraints we created
crm_resource --resource unimus_core --clear
A move may create a constraint to not place the service on the previous node in the future. This is why we clear all constraints after a mode. A useful command to check existing constraints on our cluster resource is:
crm_resource --resource unimus_core --constraintsFinal words
Hopefully this article can guide you in creating a HA setup for your Unimus Cores. If you have any questions, or you run into any issues, please feel free to post in the Support section of our forums, or contact us through our usual support channels.