Running Unimus Core in a container on MikroTik RouterOS
A short guide describing how to deploy Unimus Core in a Docker container on MikroTik's RouterOS.

The purpose of this article is to guide you through configuration for running Unimus remote Core container image on MikroTik's RouterOS.
Introduction
Today we will be discussing an exciting feature of Unimus - support for remote networks and distributed polling. Managed devices do not always have to be directly reachable by the Unimus Server. In a scenario where our devices and Unimus are separated by a WAN it would make sense to utilize a remote agent. All client devices would be polled locally which eliminates the need for individual direct server-device connections. This saves resources such as bandwidth and processing power and simplifies administration as you only need to maintain connectivity to a single host in each remote location. We would also get vastly improved scalability, enhanced security and fault isolation.
Getting to the Core™ of the matter
To extend Unimus functionality to a remote network we would use Unimus Core. A Core is the brains of Unimus. Same as the embedded Core on any Unimus Server it performs network automation, backups, change management and more on managed network devices. Acting as a remote poller, Unimus Core communicates with Unimus Server over a secure TCP connection conforming to modern industry standards. We can install Unimus Core on any supported OS, run a portable version or run a container image. Find out more on our wiki.
Fairly recently (August 2022) MikroTik added container support on their RouterOS. This introduces a nifty new way of deploying Unimus Core directly on an edge router, thus reducing the number of devices required in the network. Let's have a look at how to set this up.
Setup
Behold, the system we will be testing our remote Core deployment on:
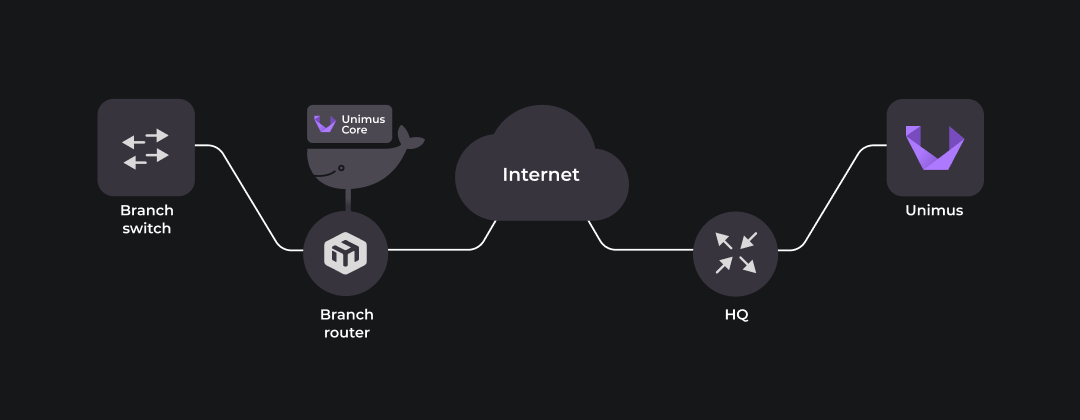
Starting from the right, the Unimus Server is installed on Ubuntu server (22.04) running on Raspberry Pi 2. It is connected via static IP to the HQ router – a MikroTik RouterBOARD. The HQ router is doing source NAT for Unimus Server, translating the private source IP to WAN interface public IP. This allows Unimus Server to reach resources outside the LAN.
HQ router is also configured for destination NAT, a.k.a port triggering, directing incoming TCP 5509 and TCP 8085 traffic to Unimus Server. TCP 5509 allows inbound remote Core connection. TCP 8085 is not strictly required for our demonstration, we open it simply for remote access to the HTTP GUI.
The left side represents a remote network. Branch router, a MikroTik RB5009UG+S+, is our edge router capable of running containers. Connected on LAN side is the device we want to manage, another MikroTik RouterBOARD - Branch switch. Branch router supports containers and will run Unimus Core in one.
Our Unimus Core container will have its own virtual ethernet interface assigned to use for communication outside. Although this 'veth' could be added to the local bridge connecting to Branch switch, it makes more sense security-wise to add it to a separate 'containers' bridge. This way any container traffic goes through the routing engine and firewall, where it can be subject to policies.
Branch router, which is likely source NATting traffic for the whole branch network, needs to also SNAT the container subnet to allow outbound communication to the Unimus Server.
Edge router WAN ports are reachable via internet simulated by a local network. This is sufficient for our testing purposes as it simulates indirect connectivity between the Unimus Server and the remote Core.
With all the moving (really just sitting and humming softly) parts introduced, let’s go through the steps needed to achieve our desired result in detail.
Configuration
The key parts we will be focusing on are Unimus Server and MikroTik RouterBOARD (Branch router) running Unimus Core in a container.
Unimus Server
We assume we already have Unimus Server up and running. If not feel free to check out our wiki to get you started.
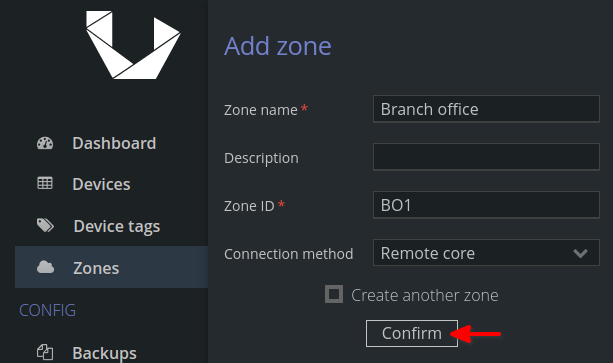
Once we are all set, we can begin by navigating to Zones and 'Add new Zone'. This Zone will represent our remote location. Enter Zone name, ID and Remote core connection method and hit 'Confirm' to proceed.
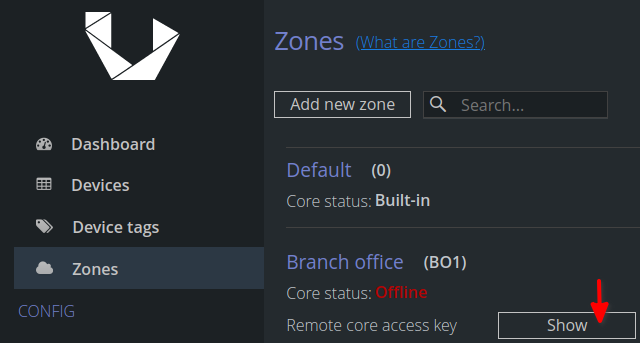
Next, we retrieve the remote core access key by hitting 'Show' and save it for later. It will be used to establish connection to the Unimus Server.
Branch router and Unimus Core
Before attempting to run any containers let's take care of the prerequisites:
RouterOS version 7.5 or higher is needed to run containers so update as necessary. Container package is compatible with arm, arm64 and x86 architectures.
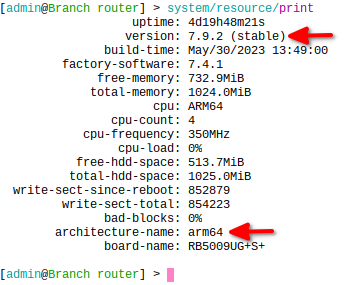
Requirements above are met. We have that going for us which is nice. The following steps will get us through the process of configuring the Branch router:
secure the router as it is dangerous on the internet
Take care of basic security. Configure a strong password and restrict management access using a firewall policy.
get the container package and install it
Visit mikrotik.com/download and get the 'extra packages' for your architecture. Extract the contents, upload the containers package to your router and reboot.
After reboot we can verify the currently installed packages:
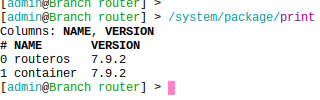
enable device-mode containers
We need to have physical access to the router for this part due to security implications. We'll be prompted to press the reset button to apply the setting.
/system/device-mode/update container=yesconfigure container interface
To allow our container access to the network it needs a virtual interface. First we will create a bridge for the container:
/interface/bridge/add name=containers
/ip/address/add address=10.1.1.1/24 interface=containers
Then we'll create a veth1 interface and assign an IP address that Unimus Core will use for communication to Unimus Server. And we add the interface to the newly created bridge:
/interface/veth/add name=veth1 address=10.1.1.2/24 gateway=10.1.1.1
/interface/bridge/port add bridge=containers interface=veth1
configure NAT
Source NAT is needed for communication outside. We want the connection originated from the container subnet translated to an IP address reachable from the outside:
/ip/firewall/nat/
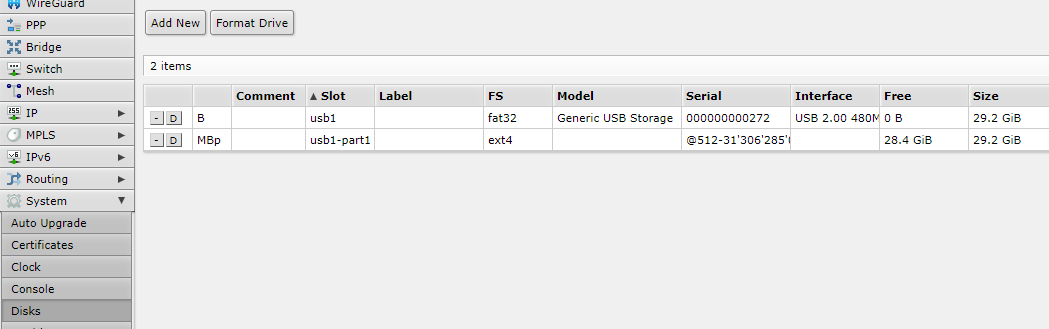
add action=masquerade chain=srcnat src-address=10.1.1.0/24 out-interface=ether1use an external drive (optional)
To avoid cluttering your platform storage we recommend using a usb stick or an external hard drive for container images and volumes. They need to be formatted to ext3 or ext4 filesystem:
Onto the configuration of the container for Unimus Core. We need to specify where to reach the Unimus Server via container environment variables, pull the Unimus Core container image and run it.
define environment variables
Variables are defined in key-value pairs. These are needed to point Unimus Core to the Unimus Server and input the Access Token we got earlier. Additionally, we can set the timezone and memory constraints for Java and there is an option to define volumes' mount points for data persistence. Details on GitHub.
/container/envs/
add key=UNIMUS_SERVER_ADDRESS name=unimuscore_envs value=10.2.3.4
add key=UNIMUS_SERVER_PORT name=unimuscore_envs value=5509
add key=UNIMUS_SERVER_ACCESS_KEY name=unimuscore_envs value=\
    "v3ry_crypto;much_s3cr3t;W0w.."
add key=TZ name=unimuscore_envs value=Europe/Budapest
add key=XMX name=unimuscore_envs value=256M
add key=XMS name=unimuscore_envs value=128M
/container/mounts/
add dst=/etc/unimus-core name=unimuscore_config src=/usb1-part1/configadding container image
We will be pulling our Unimus Core container latest image straight from Docker hub at https://registry-1.docker.io. You could also import one from a PC (via docker pull/save) or build your own. The remote Core needs to be the same version as the embedded core on Unimus Server to avoid any compatibility issues between versions. So just make sure you grab a suitable version.
/container/config/set
registry-url=https://registry-1.docker.io tmpdir=usb1-part1/pull
/container/add
remote-image=croc/unimus-core-arm64:latest interface=veth1 root-dir=usb1-part1/unimuscore mounts=unimuscore_config envlist=unimuscore_envs logging=yes
- tmpdir specifies where to save the image
- root-dir specifies where to extract the image
- mounts specify mount points for volumes to ensure data persistence if container is removed or replaced
- envlist specifies environment variables defined above
- logging is enabled for troubleshootingAfter extraction it should go to "stopped" status. Check via:
/container/print
run it!
All is set to start our remote Unimus Core.
/container/start 0run on boot (optional)
It might come in handy configuring our container to start with RouterOS boot to add some automation in case the Branch router gets rebooted for any reason.
/container/set start-on-boot=yes 0All is well that ends well
Assuming we have set it all up and everything went as planned we should see our remote Core’s status as online:
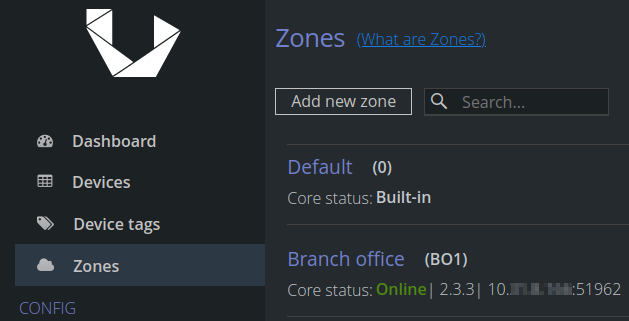
Adding our test device (the Branch Switch) under remote Core zone (BO1) prompts a discovery which results in success:

Troubleshooting
Most common issues relate to Unimus Server connectivity. Here’s a checklist of items we can try in case of need:
- Unimus Server is UP
Double-check your Unimus Server is up and running. Access it via browser at http(s)://<YourServerIP:8085/
- Firewall policy
Verify whether there’s a security rule allowing connection from outside your network.
- Check NAT
Destination NAT rule is necessary for core connection traffic. We need to translate destination address of incoming remote Core traffic to the Unimus Server IP address. TCP port 5509 is used by default.
- Check variables
Our Unimus Core container uses environment variables to establish connection to the server. Make sure the values in key-value pairs reflect your setup:
UNIMUS_SERVER_ADDRESS is the IP address where Unimus Server is reachable (before NAT)
UNIMUS_SERVER_PORT is the TCP port number (default 5509) on which Unimus listens for remote core messages
UNIMUS_SERVER_ACCESS_KEY is the long string generated when you create a new Remote Core Zone
Enabled container logs make troubleshooting easier:

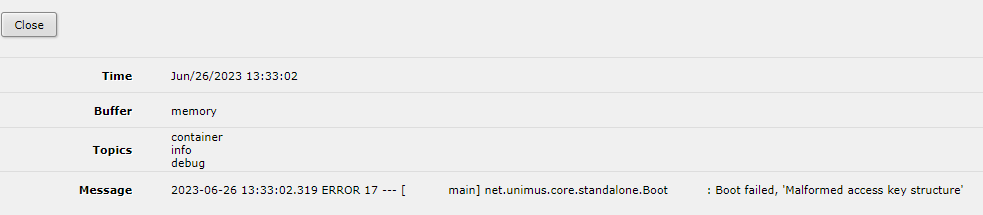
- Check versions
For Unimus Server to accept the remote Core connection they both need to run on the same version. Unimus Server log file would reveal this issue:

Attached below are the config exports used in our test setup:
# HQ router
/interface bridge
add name=local
/interface bridge port
add bridge=local interface=ether2
/ip address
add address=172.31.254.1/24 interface=local network=172.31.254.0
add address=10.2.3.4/24 comment=internet interface=ether1 network=10.2.3.0
/ip dhcp-server network
add address=172.31.254.0/24 dns-server=172.31.254.1 gateway=172.31.254.1
/ip dns
set servers=10.2.3.254 allow-remote-requests=yes
/ip firewall nat
add action=masquerade chain=srcnat out-interface=ether1
add action=dst-nat chain=dstnat dst-address=10.2.3.4 dst-port=5509,8085 protocol=tcp to-addresses=172.31.254.2
/ip route
add distance=1 gateway=10.2.3.254
/system clock
set time-zone-name=Europe/Bratislava
/system identity
set name=HQ# Branch router
/interface bridge
add name=containers
add name=local
/interface veth
add address=10.1.1.2/24 gateway=10.1.1.1 name=veth1
/container mounts
add dst=/etc/unimus-core name=unimuscore_config src=/usb1-part1/config
/container
add envlist=unimuscore_envs interface=veth1 logging=yes
/container config
set registry-url=https://registry-1.docker.io tmpdir=usb1-part1/pull
/container envs
add key=UNIMUS_SERVER_ADDRESS name=unimuscore_envs value=10.2.3.4
add key=UNIMUS_SERVER_PORT name=unimuscore_envs value=5509
add key=UNIMUS_SERVER_ACCESS_KEY name=unimuscore_envs value="secret key"
add key=TZ name=unimuscore_envs value=Europe/Budapest
add key=XMX name=unimuscore_envs value=256M
add key=XMS name=unimuscore_envs value=128M
/interface bridge port
add bridge=local interface=ether2
add bridge=containers interface=veth1
/ip address
add address=10.8.9.10/24 interface=local network=10.8.9.0
add address=10.5.6.7/24 comment="internet" interface=ether1 network=10.5.6.0
add address=10.1.1.1/24 interface=containers network=10.1.1.0
/ip dns
set servers=10.5.6.254 allow-remote-requests=yes
/ip firewall nat
add action=masquerade chain=srcnat src-address=10.1.1.0/24 out-interface=ether1
/ip route
add disabled=no dst-address=0.0.0.0/0 gateway=10.5.6.254 routing-table=main
/system clock
set time-zone-name=Europe/Bratislava
/system identity
set name="Branch router"Final words
We hope this guide can serve as a template for deploying Unimus Core container on MikroTik’s RouterOS. If you encounter any difficulties or have additional questions please reach out on the forum.