NMS Sync improvements in Unimus 2.4.0
Unimus 2.4.0 brings a complete rewrite of the NMS Sync logic, adding support for many new use-cases. In this article we showcase new Sync Preset settings that give you more control over Sync behavior.

The Unimus 2.4.0 release brings a complete rewrite of the NMS Sync feature logic. It gives you more options and control over Sync behavior, with minimal complexity added to the user experience.
The key addition to the functionality is device orphaning. Its role is to keep track of changes in device presence and state provided by the import source (NMS). Device additions, changes or removals are now automatically reflected in local inventory (Unimus).
There are two new settings to notice in the GUI of NMS Sync Preset configuration. These control Device action policy and Orphaning policy described in detail in sections below.
Lastly, we have also added two new group identifiers for Zabbix. We can now select devices to import that are using specific templates and/or tags by prefixing their names by '%' and '@', respectively. Host groups are used as before without any prefix.
Showcase of new features
In case you prefer a video format, you can watch an overview of the changes here:
How it works
The NMS Sync is a feature for importing devices into Unimus. Synchronization of devices from NMS systems automates the adoption of new networks into Unimus and simplifies device management by delegating the task entirely to the NMS (no need to manage devices across both Unimus and the NMS separately).
Since 2.1.0 the NMS Sync configuration is Preset-based, where each Sync Preset defines from which NMS to sync which devices into which Zone(s). The rework in 2.4.0 expands the Preset-based mechanics by Preset adoption. Each device imported by an NMS Sync Preset is now adopted by that given Sync Preset, allowing consistent identification of synced devices.
NMS Sync takes a device set provided by import source (NMS) and mirrors it in the local inventory (Unimus). Let's take a look at steps needed for a run-of-the-mill setup of an NMS Sync Preset:
- Create NMS Sync Preset of your NMS type specifying URL and credentials
- Create a Sync Rule specifying which groups of devices in the NMS should be imported
- Specify this Rule's target Zone to import devices into
- Go to step 2 if you want to define another Rule
- Leave other settings at default values
- Run and/or schedule the NMS Sync
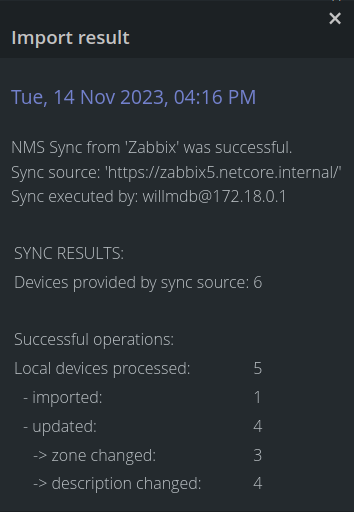
After an NMS Sync runs its course it is considered successful if there were no errors or failures, otherwise it goes into the 'Failed jobs' bucket. Detailed report of either can be viewed in 'Dashboard > Import job history'. There we can find all the information about the import source, sync errors, processed, imported, updated devices and failed operations counts.
The nature of the beast
Unimus currently supports seven different NMSes. You may create Sync Presets with different systems and sync to the same Zone or you may have different instances of the same NMS and sync to different Zones. These systems may or may not support universally unique identifiers (UUIDs) for devices. You may even want to move devices between Zones manually and still be sure of what happens to them following an NMS Sync.
The logic needed to behave consistently during any changes, be it on the NMS, in Sync Preset Rules configuration or other settings in Unimus. It also needs to account for devices with matching address within and outside of a Sync Rule target Zone. Suffice to say the logic rework turned out to be quite the undertaking.
The following sections take a closer look at concepts, behaviors and policies introduced with the NMS Sync rework.
Remote UUIDs
As mentioned before, some of the NMSes Unimus supports provide UUIDs for devices during a Sync operation. These uniquely identify previously imported devices, enabling more consistent device tracking between Unimus and the remote systems. As an example, when UUIDs are used, changing device IP address of a host on the NMS would also result in local device IP address update. This would not be possible without UUIDs, since IP address, that has been changed, is used as the identifying parameter if a UUID is not present.
NMSes that support UUIDs: LibreNMS, NetXMS, Observium and Panopta
Device Action policy
This policy controls the behavior when syncing a device from the NMS. It can be either to always try to Create a new device for the one provided by import source, or try to Move an existing one within a scope, if it is a match.
The default setting is Move within Preset Zones. The "Preset Zones" scope consist of Zones used by Sync Preset's Rules. Before creating a new device (in the target Zone a Rule specifies) the Sync logic will look for an existing device with matching UUID or address within the scope and moves it to the target Zone if one is found. The benefit is keeping track and moving of devices in response to changes in the NMS, which ensures duplicates are not created.
The Move from All Zones option is similar to the previous one, but a system wide scope is used when looking for matching devices to move to the Rule target Zone.
Policy setting No Move/Always Create is used to turn off the moving of devices during the NMS Sync. Only target Zone is looked at when matching a device provided by import source. If a device with the same UUID or address is not present in this Zone, it is created. If it is found, it has its attributes updated. This is handy for environments using same addressing for multiple device in multiple Zones, such as an MSP managing external networks.
Note: moving of existing devices fails if two or more devices with the same identifier are found in the scope, as the algorithm has no way of determining which device the user intended to "move" and counts it as 'failed to update'.
Device Adoption
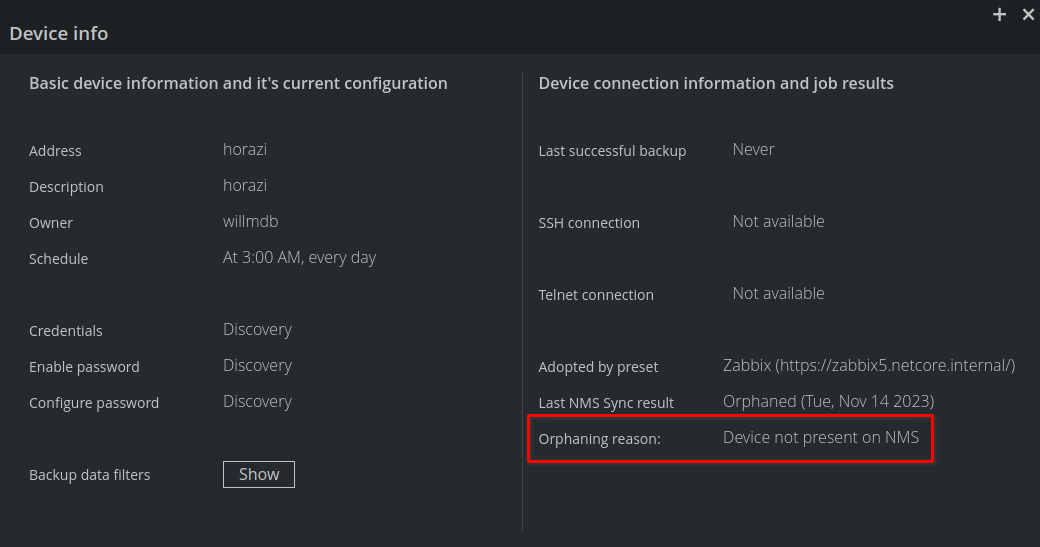
An adopted device is simply a device that was imported from an NMS by a Sync Preset. Device adoption designates its parent Sync Preset as the only one that manages any changes on it. An existing device in local inventory is eligible for adoption by a Sync Preset when it is not adopted (manually created device) or when it is orphaned. Devices can become orphaned in multiple cases:
- device is no longer present in the device set provided to Unimus by the NMS (was deleted on the NMS, or moved outside the devices Unimus imports)
- when the Zone was changed in a Sync Rule, all devices adopted by this Sync Rule are orphaned
- when the Sync Rule is deleted, all devices adopted by this Sync Rule are orphaned
- when a device is moved to a different Zone manually by the user (this includes the result of Zone deletion with moving of devices to the default Zone)
Orphaning status can be checked via device info.
Adoption is useful for associating not already adopted devices on Unimus with those on the NMS.
Orphaning policy
Orphaning policy determines what happens to orphaned devices during an NMS Sync. User has three options that determine what action to take on orphaned devices during an NMS Sync:
- No action - device is kept as is, though it is now eligible for adoption by any NMS Sync Preset
- Unmanage - device becomes unmanaged in Unimus, no further jobs will run on it. It will be kept in Unimus, along with any existing backups; it is also eligible for another adoption
- Delete - device will be deleted from Unimus, alongside its backups, so this option should be used with a clear intent and a dose of awareness of possible results
Example scenario
Let's simulate a scenario where we want to defer ongoing device management to NMS in a way that any change to device set on NMS is reflected in local inventory on Unimus.
The starting point on Unimus is a set of devices not adopted by any Sync Preset. The first thing that will happen is pairing the devices between the systems and adopting them by our Sync Preset. In addition the devices will also be moved to Zones corresponding with organizational structure present on the NMS. Next, any other devices not present on Unimus will be imported.
This is easily achieved by setting up a Sync Preset with Preset rules specifying organizational groups on the NMS and pointing to specific Zones. Since we want the existing devices moved to specific Zones and we want the algorithm to look for them throughout entire Unimus we will use the 'Move from All Zones' Device Action policy.
After running the NMS Sync we see a successful import notification. Devices are now properly adopted and organized among Zones. Automatic device synchronization is achieved by setting the Sync preset as a 'Scheduled sync'. Any changes, additions or removals of devices in organizational groups on the NMS are reflected in local inventory after the next NMS Sync.
Final words
Congratulations, dear reader, on making it this far! You are now acquainted with the updates to the NMS Sync feature in Unimus. Feel free to experiment with it, and let us know what works and if something doesn't on our Forum.