Automating MikroTik SwOS backups with Unimus
MikroTik SwitchOS, unlike its RouterOS sibling, doesn't have a CLI interface over SSH nor Telnet. In this article, we look at how to pull backups from SwOS through its HTTP(S) interface into Unimus.
MikroTik SwitchOS, unlike its RouterOS sibling, doesn't have a CLI interface over SSH nor Telnet. In this article, we look at how to pull backups from SwOS through its HTTP(S) interface into Unimus.
While we are planning to add native support for HTTP(S) connectors into Unimus, we would like to showcase that even though native support for HTTP(S)-only devices is still not ready, Unimus is equipped with tools to allow users to push backups from such devices into Unimus.
A few months ago we published a guide on how to push backups from FRR (FRRouting) into Unimus. In this article, we will look into MikroTik SwOS, downloading a backup via its HTTP(S) interface, and getting these backups to Unimus. Let us show you how below.
STEP 1 - Adding MikroTik SwOS devices to Unimus and generating an API token
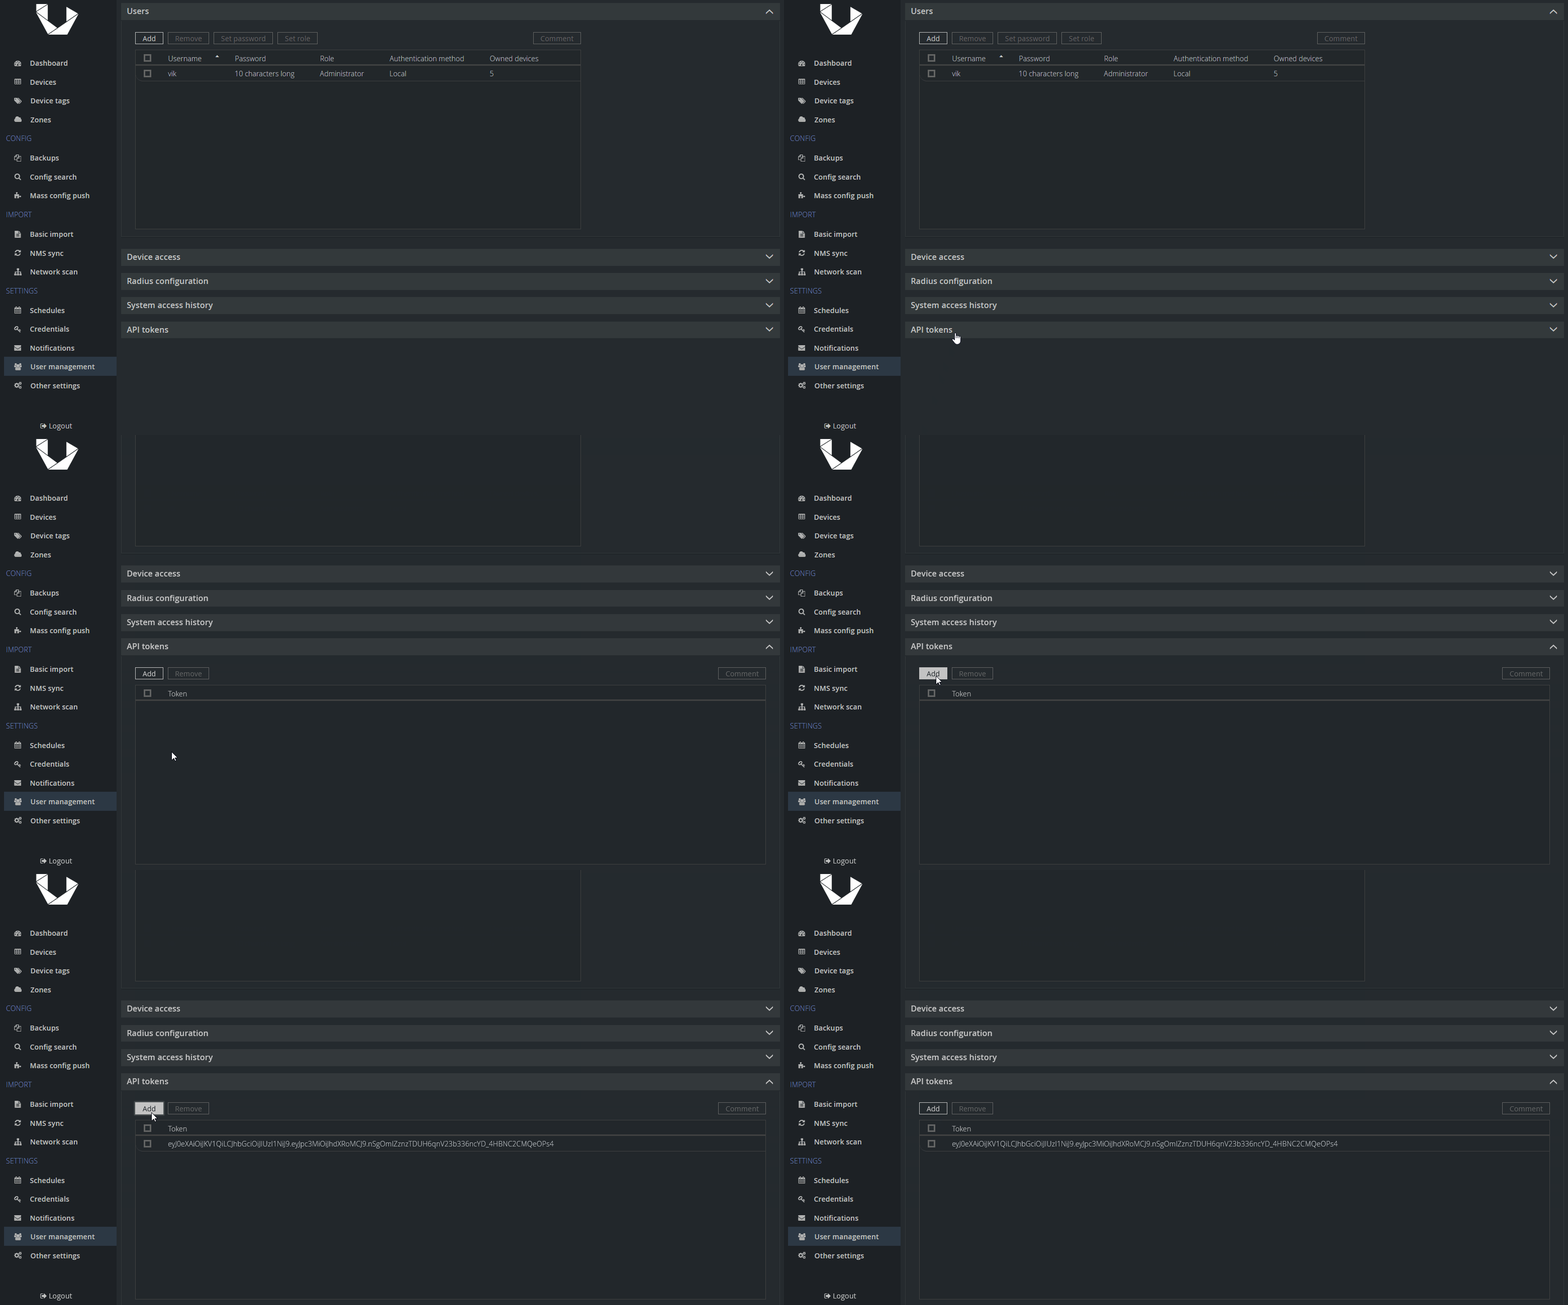
As a first step, we want to prepare things in Unimus for our new devices and also generate an API token to be able to submit API calls and upload our backups. Let's start with the API token:

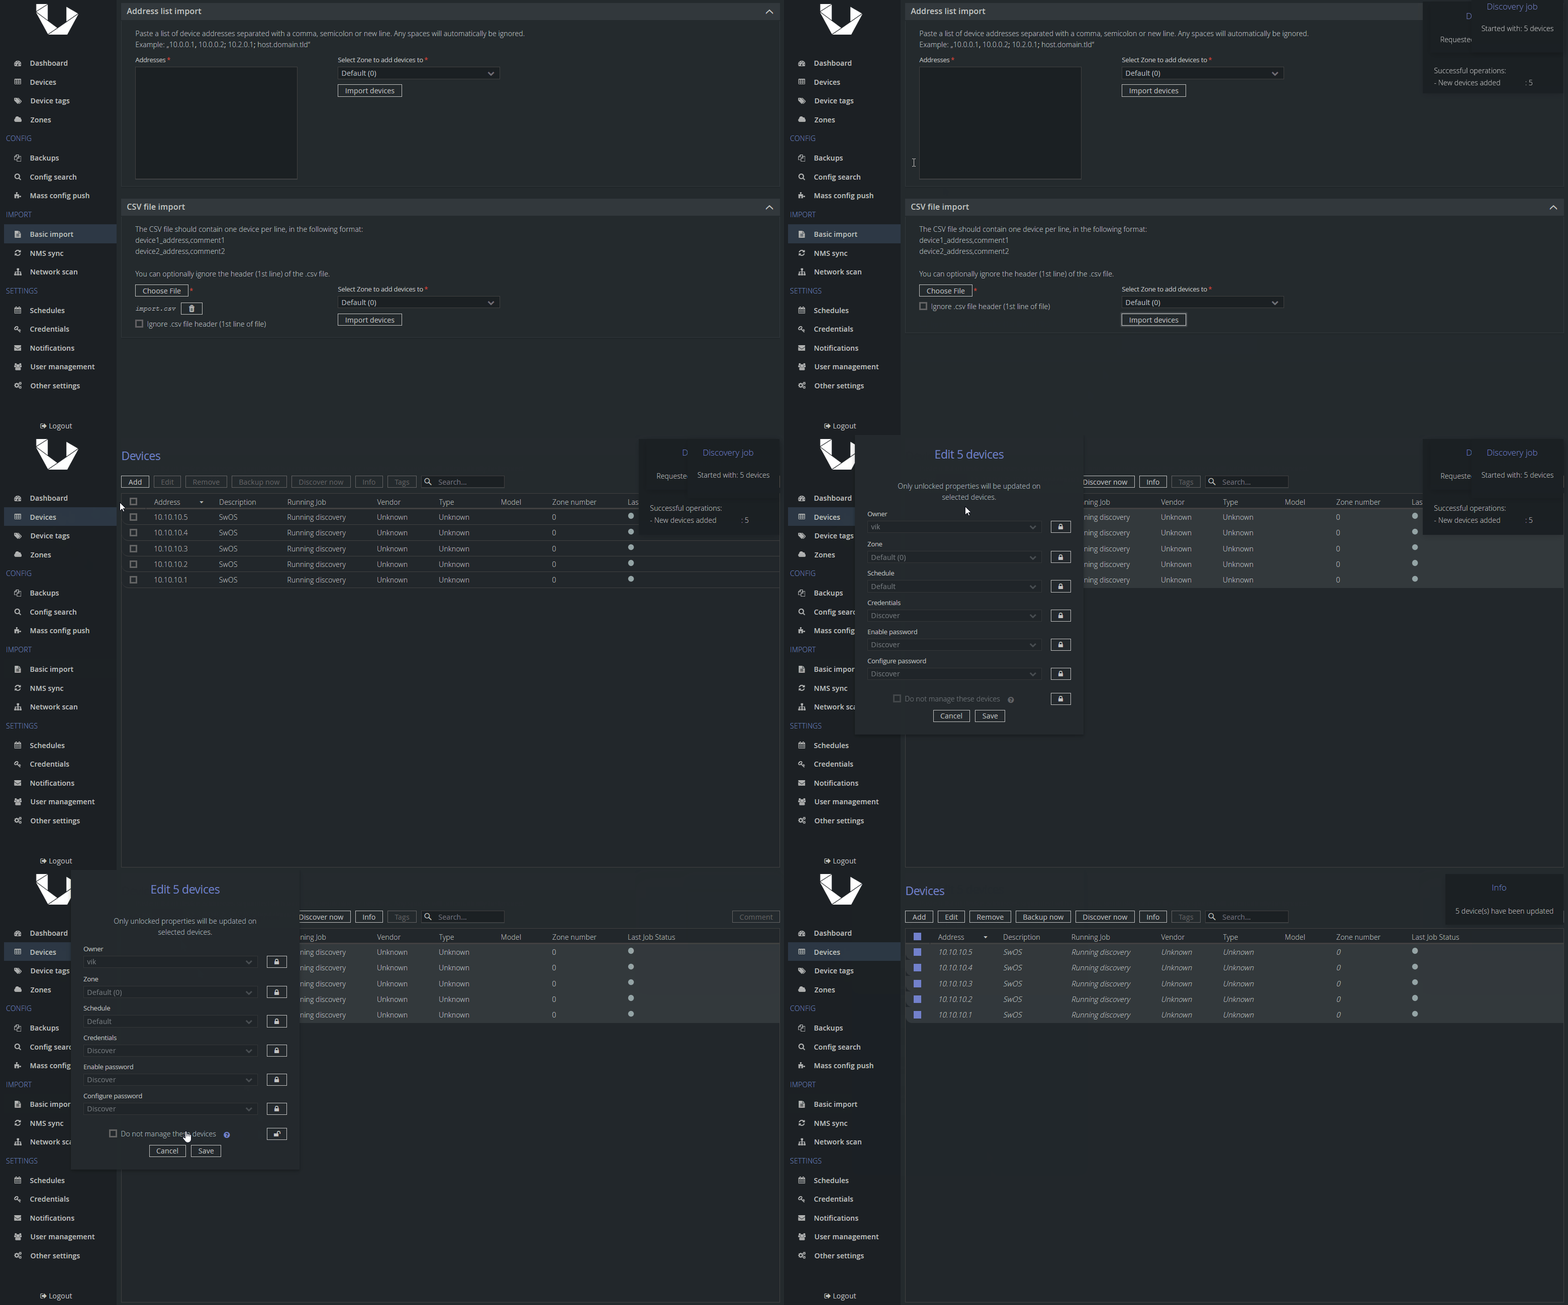
The next step is to add our SwOS devices into Unimus and give them an identical description so that the script is able to fetch all the devices by the Description field. Lastly, we want to set them as Unmanaged devices, so Unimus will not try to run Discovery (nor Backups) on these devices, as that would fail.
To do so, you can use any of the methods you already know, whether by adding them manually to the list of devices or by importing them in bulk. However, we recommend the latter. In the example below I imported an CSV file with five devices with a predefined comment SwOS which will be imported as a device's description.

After importing the devices, we need to set them as Unmanaged. Note that you cannot edit the Description field in bulk, so you can see why the CSV import is the recommended method. It will save you a lot of time.
STEP 2 - preparing a backup and uploading it into Unimus
If you haven't had a chance to familiarize yourself with the Unimus API, we recommend checking out our introduction to the Unimus API in our FRRouting article here, which includes more details on what we will be doing here as well.
When we looked into options to upload a backup of FRR, we showed you both ways of uploading a text or a binary file. In this article we will focus only on the latter option as the SwOS backup is not human-readable and, as such, it doesn't benefit us to upload it as a text.
Binary backup means that we will be uploading a file, instead of just text. In this case, it will be SwOS's backup file backup - .swb.
The script we use below also requires information which you will need to fill in before running it. These information include:
- Unimus address
- Unimus port
- API token you created in the first step
- Device description string used to filter devices in Unimus - this string should be unique to just SwOS devices
- Device username
- Device password
#!/bin/bash

#Basic settings
unimusaddress=
unimusport=
apitoken=
devicedescription=
deviceuser=
devicepass=

#Set a working directory in the current directory
cd "${0%/*}"

#Get devices with a given description and filter out a list of IPs
getdevices=$(curl -s -H "Accept: application/json" -H "Authorization: Bearer $apitoken" "http://$unimusaddress:$unimusport/api/v2/devices/findByDescription/$devicedescription")
deviceiplist=$(echo $getdevices | grep -E -o "(25[0-5]|2[0-4][0-9]|[01]?[0-9][0-9]?)\.(25[0-5]|2[0-4][0-9]|[01]?[0-9][0-9]?)\.(25[0-5]|2[0-4][0-9]|[01]?[0-9][0-9]?)\.(25[0-5]|2[0-4][0-9]|[01]?[0-9][0-9]?)")

for i in $deviceiplist; do
    echo $i
    #Download the backup from the device
    wget -t 1 -T 10 -q --user $deviceuser --password $devicepass http://$i/backup.swb && echo "Download finished."

    #If the downloaded backup is not empty, upload it to Unimus. Otherwise, skip it.
    if [ -s backup.swb ]; then
        #Get the current device's ID necessary for the upload
        getdeviceiddirty=$(curl -s -H "Accept: application/json" -H "Authorization: Bearer $apitoken" "http://$unimusaddress:$unimusport/api/v2/devices/findByAddress/$i")
        if [[ $getdeviceiddirty =~ \"id\":([[:digit:]]+?), ]]; then
            deviceid=${BASH_REMATCH[1]}
        fi

        #Encode the backup for transport using BASE64
        encodedbackup=$(base64 -w 0 backup.swb)

        #Upload the backup to Unimus
        curl -s -H "Accept: application/json" -H "Content-type: application/json" -H "Authorization: Bearer $apitoken" -d '{"backup":"'"$encodedbackup"'","type":"BINARY"}' "http://$unimusaddress:$unimusport/api/v2/devices/$deviceid/backups" -o /dev/null && echo -e "Upload finished.\n"
    else
        if [[ -f backup.swb ]]; then
            echo -e "Downloaded backup from device $i is empty. Skipping the file...\n"
        else
            echo -e "Backup from $i could not be retrieved. Skipping the file...\n"
            continue
        fi
    fi
    #Cleanup
    rm backup.swb
done
Here is a breakdown of the workflow of this script:
- First, the script will use the Unimus API to fetch a list of devices (searching by the device description) and prepare a list of IPs.
- Then, the script works through each IP within a loop.
- In the loop, the script will download a backup and check if the backup file was successfully downloaded and if it contains data.
- If it does, the script will use the Unimus API again to fetch the device ID for the particular IP, encode the backup, and upload it to Unimus.
- If the file is not downloaded (e.g., the device is offline) or the downloaded file is empty, it will handle both cases separately and return the appropriate message to inform the user if such a case pops up.
- Lastly, the script cleans up the backup file and repeats with the next IP.
This is an example of what your output may look like after the script is finished:
10.10.10.1
Download finished.
Upload finished.

10.10.10.2
Unable to retrieve backup from 10.10.10.2. Skipping the file...

10.10.10.3
Download finished.
Upload finished.

10.10.10.4
Download finished.
Upload finished.

10.10.10.5
Downloaded backup from device 10.10.10.5 is empty. Skipping the file...
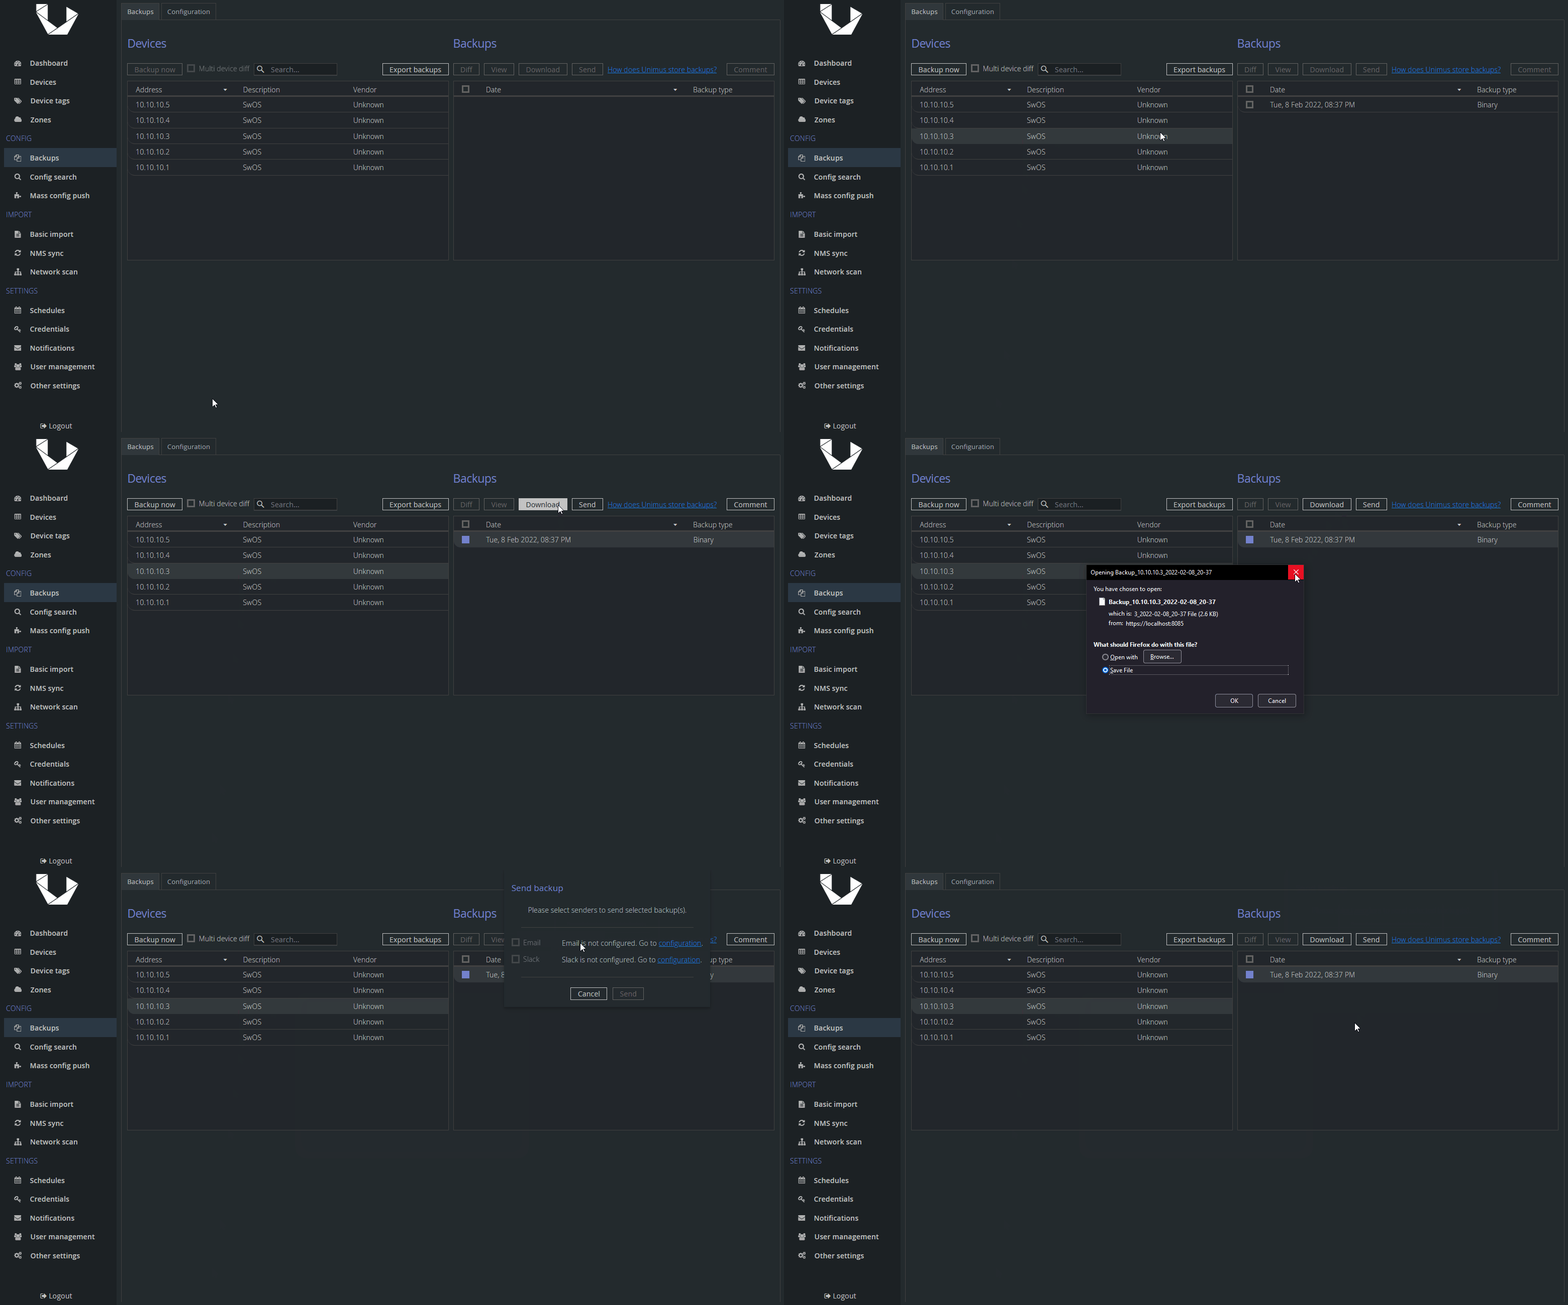
Now, let's check Unimus and see if we got our backup and what we can do with it:

As you can see, Unimus received our backup, but compared to a text backup, we cannot see contents of this file. This is because it is a binary file and it could be in any format - .tar.gz, .bin, .zip, etc. We can still download or send it.
If there is a change to this binary file we will see it correctly reflected in Unimus creating a new change point and if we were to check Diff, we would see the changed SHA1 sum.
Note, when downloading a binary backup, Unimus will not append any extension to this file, we recommend renaming it right away.
STEP 3 - job scheduling
One-time execution of scripts is nice, however just as with any backup job, we want it to be run automatically and periodically.
The last part of this article will be adding a scheduled job to Cron. Depending on your software and/or user privileges you have, you might need to change the way to set up a cron job, e.g. via user-specific jobs using crontab -e. Since with our setup we need root privileges for accessing cron configuration files, we will add a job to /etc/crontab directly, and set our script to run every night at 3AM (just like our default schedule in Unimus).
0 3 * * * root /root/swos_backup.shAnd that's it! We have created an automated way to generate and upload backups into Unimus for MikroTik SwOS devices.
Final words
We hope this article can serve as a template that can be used to upload any files / backups into Unimus. If you have any questions, or run into any issues using the examples in this article, please feel free to post in this topic in the Automation section of our Forums.
