
Automating FRR backups with Unimus - a how-to guide
A guide to create and upload backups of FRRouting (FRR) into Unimus. Useful scripts for use with the Unimus API for FRR backup and config management...
The goal of Unimus is to automatically, and out-of-the-box support any networking equipment without having to manually feed all the information about it into the system. The overall design of Unimus, and specifically our Discovery mechanism make this possible on your networking devices.
However, there are some cases in which this is not possible - specifically when networking functions are provided as software running on a generic-purpose machine with a generic OS. For instance a piece of software installed on you Linux Server on Ubuntu, Debian, etc. While going through all installed packages on a Linux machine and properly identifying networking-related software is possible (at the cost of causing load on these machines), natively backing up all the possible configurations of all software packages is just about impossible. Unimus would have to understand the packaging specifics of all of these packages across all the Linux distributions, and would have to understand how config is structured (even when you can include external configuration through config files) for each of these packages, which is not realistic.
Lately we have seen multiple inquiries about specific networking packages and we decided that this is a good time to share a guide on how you can create and upload backups of almost any software config files into Unimus. The package we chose to feature in this article is a routing software suite FRRouting.
With its capabilities and availability across all major Linux distributions (including Debian / Ubuntu, CentOS, RHEL and more), FRR has a large user-base. Other similarly powerful networking focused software package of course exist, and you may want to keep their backups in one place - Unimus, which you use to back up all your networking equipment anyway. This is the good kind of centralization after all.
Let's get to the good stuff. While we are not able to support software such as FRR directly, you can use one of the features of Unimus to do so. Say hello to the Unimus API! With a bit of simple bash scripting on the host machines running FRR (or other software) you can collect and backup your configuration files and/or binary backups generated by such software and store them in Unimus. All the usual features of Unimus (like change management / change notifications, etc.) will work as expected.
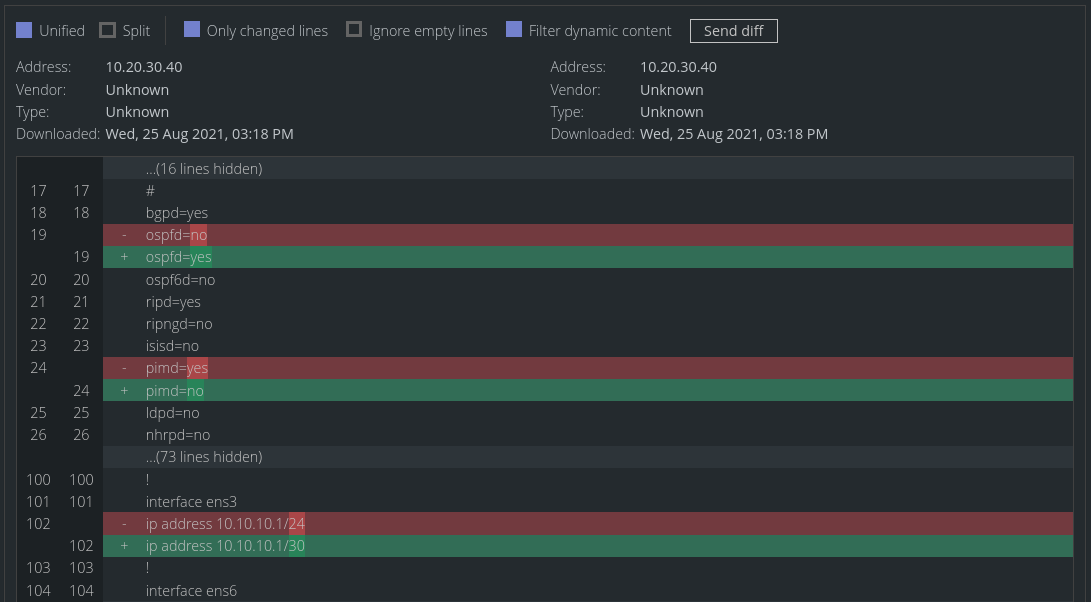
Without any further ado, let us show you how we can do just that in a few steps.
STEP 1 - preparing Unimus and setting you up with an API token
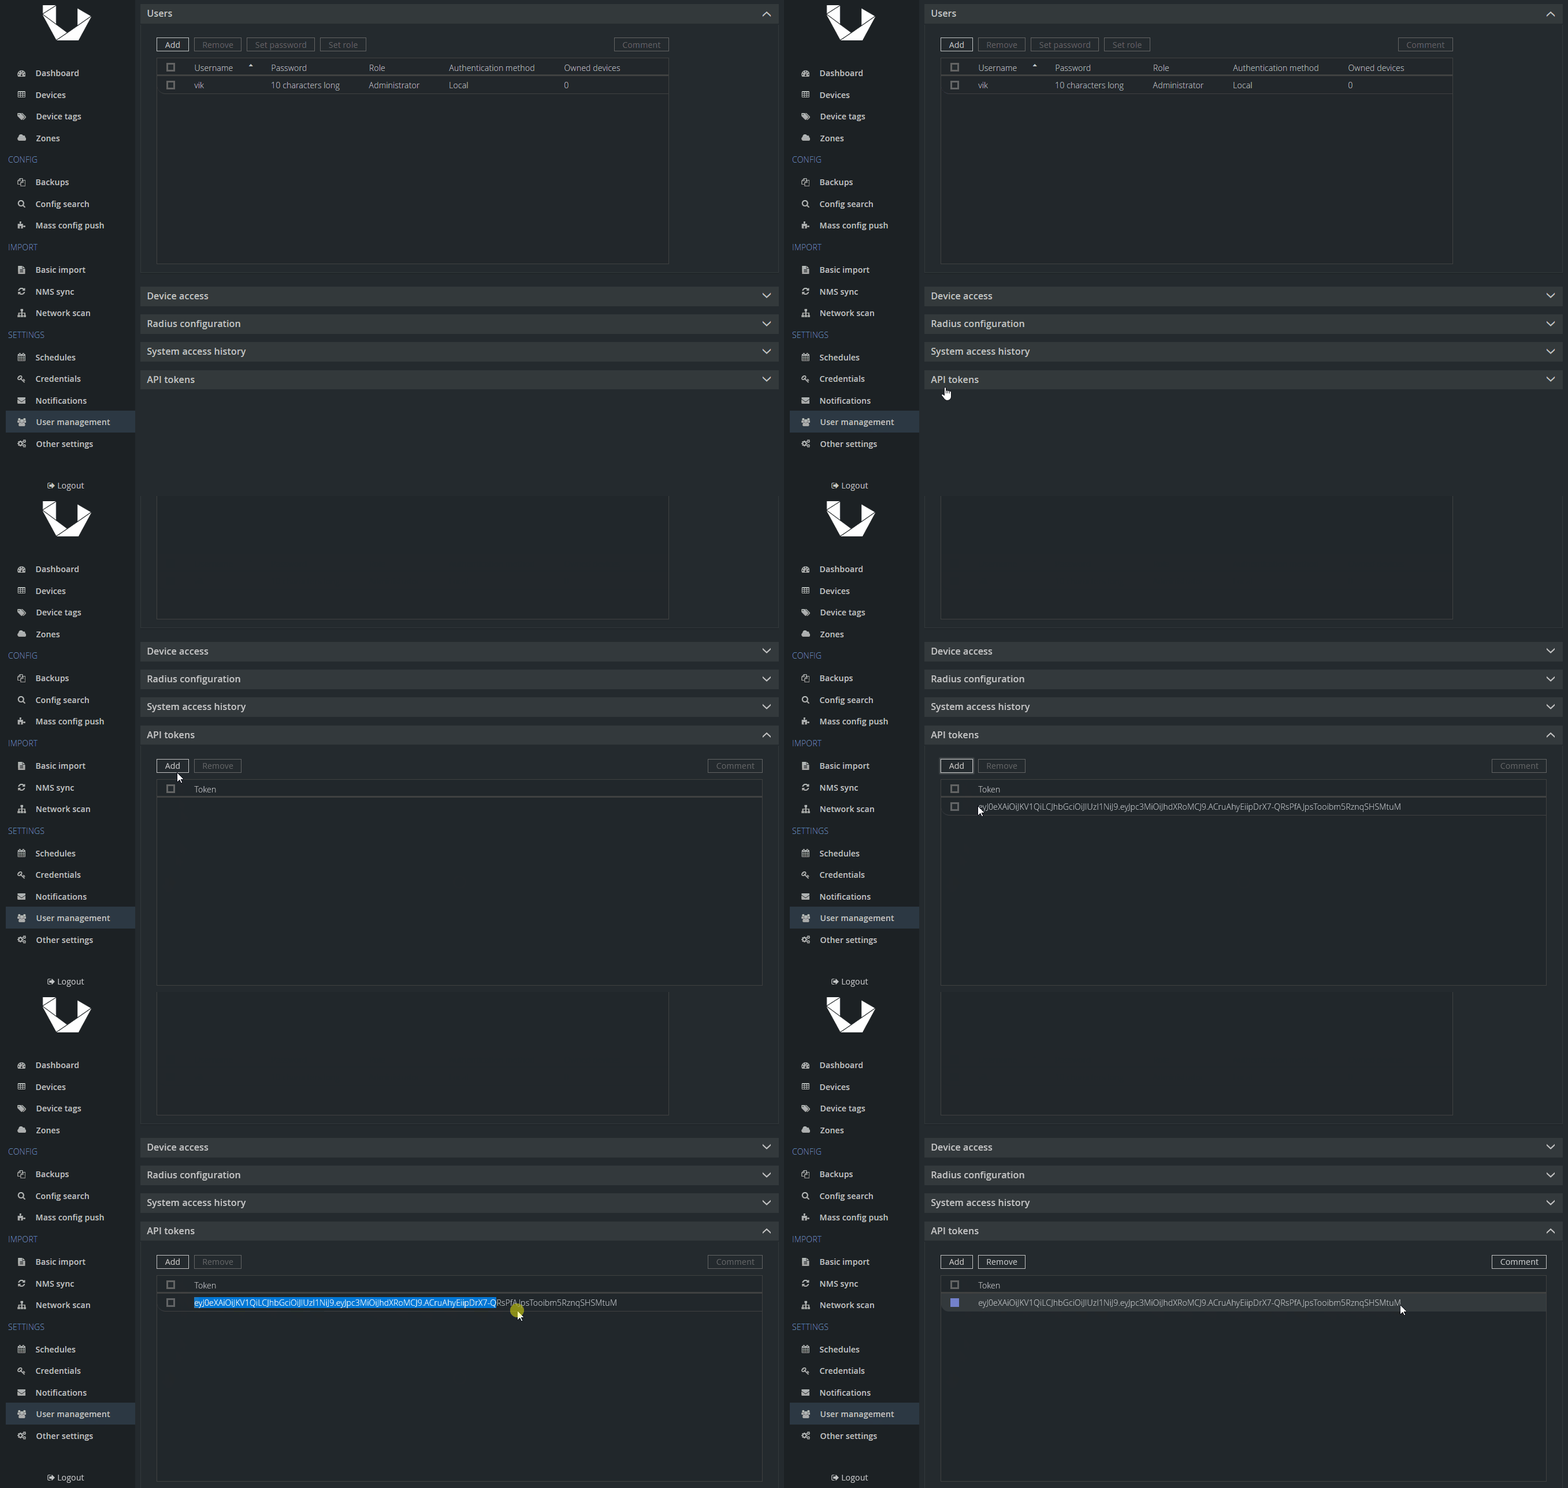
As a first step, we want to prepare things in Unimus for our new device and also generate an API token to be able to submit API calls and upload our backups into Unimus. Let's start with the API token:
Now, let's create our new device, which will represent a machine running FRRouting and set it to be unmanaged. We will create a device, specify its IP/hostname and add a description (helps with identification in your device list):
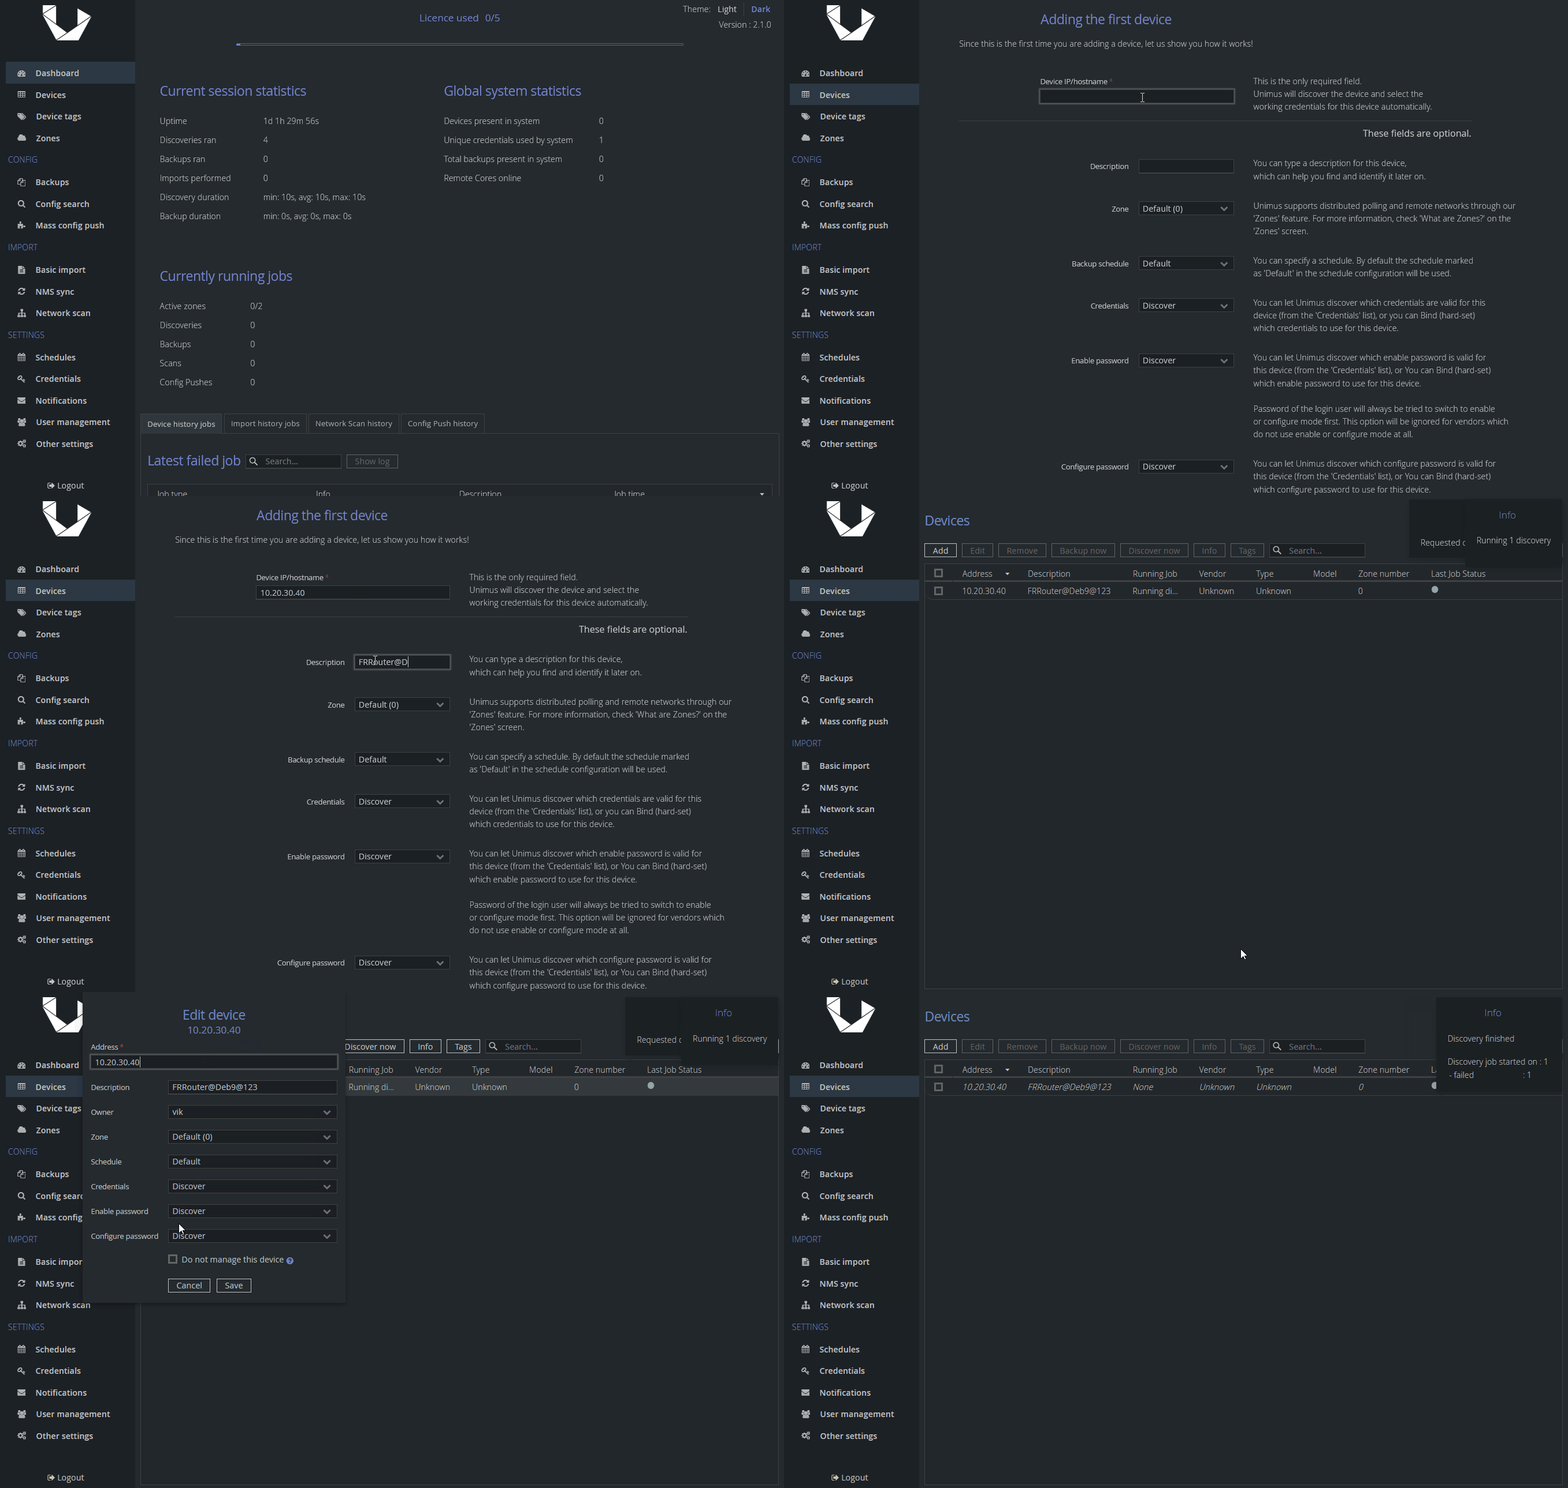
If you see a message informing you about an unsuccessful discovery job, this is expected. This was an automatic discovery triggered as soon as we added the device and before we set it to be Unmanaged.
STEP 2 - getting familiar with Unimus API
Unimus' API is a powerful tool and many functions of Unimus are exposed through it. You can check the full API documentation here if you wish. We will use the API to our advantage here as well. The API function we are interested in is a function to create a new backup.
Starting from this point, you will need your Linux CLI. Let's start with a curl command we will use to upload our backups into Unimus:
curl -H "Accept: application/json" -H "Content-type: application/json" -H "Authorization: Bearer <token>" \
-d '{"backup":"<backup>","type":"<TEXT>"}' "http://example.unimus/api/v2/devices/<deviceId>/backups"
There are 5 parameters we need to provide in order to successfully push it:
<token>            - this is our API token we generated in step 1
<backup>           - this will be our encoded backup we will prepare in step 3
<TEXT>             - this will be a type of backup we will choose (BINARY/TEXT) also in step 3
<example.unimus>   - this is your Unimus server address
<deviceId>         - this will be an ID of our device we created in step 1
Now, let's get the ID of our newly created device representing our machine running FRR. We can use one of two functions to do so, one searching our device by its IP/hostname, the other one searching for our device by its description. Let's check out both:
Option 1 - searching device by its IP/hostname
https://wiki.unimus.net/display/UNPUB/Full+API+v.2+documentation#FullAPIv.2documentation-Devices-getdevicebyaddress
curl -H "Accept: application/json" -H "Authorization: Bearer <token>" \
"http://<example.unimus>/api/v2/devices/findByAddress/<address>?attr=s,c"
There are 3 parameters we need to insert in this command:
<token>            - this is our API token we generated in step 1
<example.unimus>   - this is Unimus' server address
<address>          - this is IP/hostname of our device
As per the example, let us show you our version of the curl call, inserting the API key, Unimus' address and device's IP:
curl -H "Accept: application/json" -H "Authorization: Bearer \
eyJ0eXAiOiJKV1QiLCJhbGciOiJIUzI1NiJ9.eyJpc3MiOiJhdXRoMCJ9.ACruAhyEiipDrX7-QRsPfAJpsTooibm5RznqSHSMtuM" \
"http://10.10.10.10:8085/api/v2/devices/findByAddress/10.20.30.40?attr=s,c"
And here is a response we got:
"data":[{"id":234,"createTime":1629477261,"address":"10.20.30.40","description":"FRRouter@Deb9@123",
"schedule":null,"vendor":null,"type":null,"model":null,"lastJobStatus":"FAILED","connections":[]}],
"paginator":{"totalCount":1,"totalPages":1,"page":0,"size":20}}
Our device's ID is 234.
Option 2 - searching device by its description
https://wiki.unimus.net/display/UNPUB/Full+API+v.2+documentation#FullAPIv.2documentation-Devices-getdevicesbydescription
As in option 1, here's our version of a curl call, inserting the API key, Unimus' address and device's description:
curl -H "Accept: application/json" -H "Authorization: Bearer \
eyJ0eXAiOiJKV1QiLCJhbGciOiJIUzI1NiJ9.eyJpc3MiOiJhdXRoMCJ9.ACruAhyEiipDrX7-QRsPfAJpsTooibm5RznqSHSMtuM" \
"http://10.10.10.10:8085/api/v2/devices/findByDescription/FRRouter@Deb9@123attr=s,c"
And here is a response we got:
"data":[{"id":234,"createTime":1629477261,"address":"10.20.30.40","description":"FRRouter@Deb9@123",
"schedule":null,"vendor":null,"type":null,"model":null,"lastJobStatus":"FAILED","connections":[]}],
"paginator":{"totalCount":1,"totalPages":1,"page":0,"size":20}}
Same as before, our device's ID is 234.
At this point, we know what API calls we need to use, we know our API token and we know our device's ID. Let's move to pushing a backup of our config to Unimus.
STEP 3 - preparing a backup and uploading it into Unimus
For this article we tested FRRouting as our weapon of choice and installed it on three Linux machines; running Debian 9, Ubuntu 20 and CentOS 7. We can happily report we haven't found any difference in configuration files' locations, which we will focus on below. This, however, may be different for the software you would look to backup with Unimus, thus always follow specific instructions for the installation and where backups and/or configuration files are stored.
FRR doesn't have a backup feature per se, instead as with much of other software packages, we can simply back up its configuration files. In case of FRR we will be backing up two configuration files:
/etc/frr/daemons
/etc/frr/frr.conf
We will do so in two ways to show you the two formats of backups you can choose to suit almost any scenario.
Method 1 - TEXT backup
One of the ways you can choose to create and upload your backup into Unimus is in a form of a text file. This method is generally recommended (if possible) as you will be able to see contents of this text file and receive appropriate configuration change notifications of its contents as well. In our case, we will be backing up two text files which we merge into one and upload it as a single text file. Here is a very simple script to do so:
#!/bin/bash

cd /tmp

#BACKUP PREP
echo -e "#BEGIN /etc/frr/daemons" > frrbackup.txt
cat /etc/frr/daemons >> frrbackup.txt
echo -e "#END /etc/frr/daemons\n\n\n" >> frrbackup.txt
echo -e "#BEGIN /etc/frr/frr.conf" >> frrbackup.txt
cat /etc/frr/frr.conf >> frrbackup.txt
echo -e "#END /etc/frr/frr.conf" >> frrbackup.txt

#BASE64 ENCODING
encodedbackup=$(base64 -w 0 frrbackup.txt)

#BACKUP PUSH INTO UNIMUS
curl -H "Accept: application/json" -H "Content-type: application/json" -H "Authorization: Bearer \
eyJ0eXAiOiJKV1QiLCJhbGciOiJIUzI1NiJ9.eyJpc3MiOiJhdXRoMCJ9.ACruAhyEiipDrX7-QRsPfAJpsTooibm5RznqSHSMtuM" \
-d '{"backup":"'"$encodedbackup"'","type":"TEXT"}' "http://10.10.10.10:8085/api/v2/devices/234/backups"

#CLEANUP
rm frrbackup.txt
Here is a breakdown of the workflow of this script:
- First it prepares a backup file with some additional formatting so that it is easier to distinguish beginning/end of each in the final text file.
- Then a content of the prepared backup text file is passed to BASE64 encoder and loaded into a variable - this encoding is very important as it encodes the contents into a single streamlined string of characters allowing us to move it efficiently. Note, BASE64 encoding doesn't encrypt the content of your files, anyone could decode it with any BASE64 decoder.
- Then using curl call from step 2 we fill in all parameters required with actual data, and changed backup type to TEXT - note the use of extra single/double quotes to insert the variable containing our encoded backup, This format is important so that the variable is processed correctly.
- Lastly we clean up.
We can now run the script. As specified in our API documentation, we are expecting this output:
{"data":{"success":"true"}}If you don't see this output, it indicates there was a problem sending the backup. Refer to our API documentation to find more information if needed. Now, let's check Unimus and see if we got our backup and all is readable:
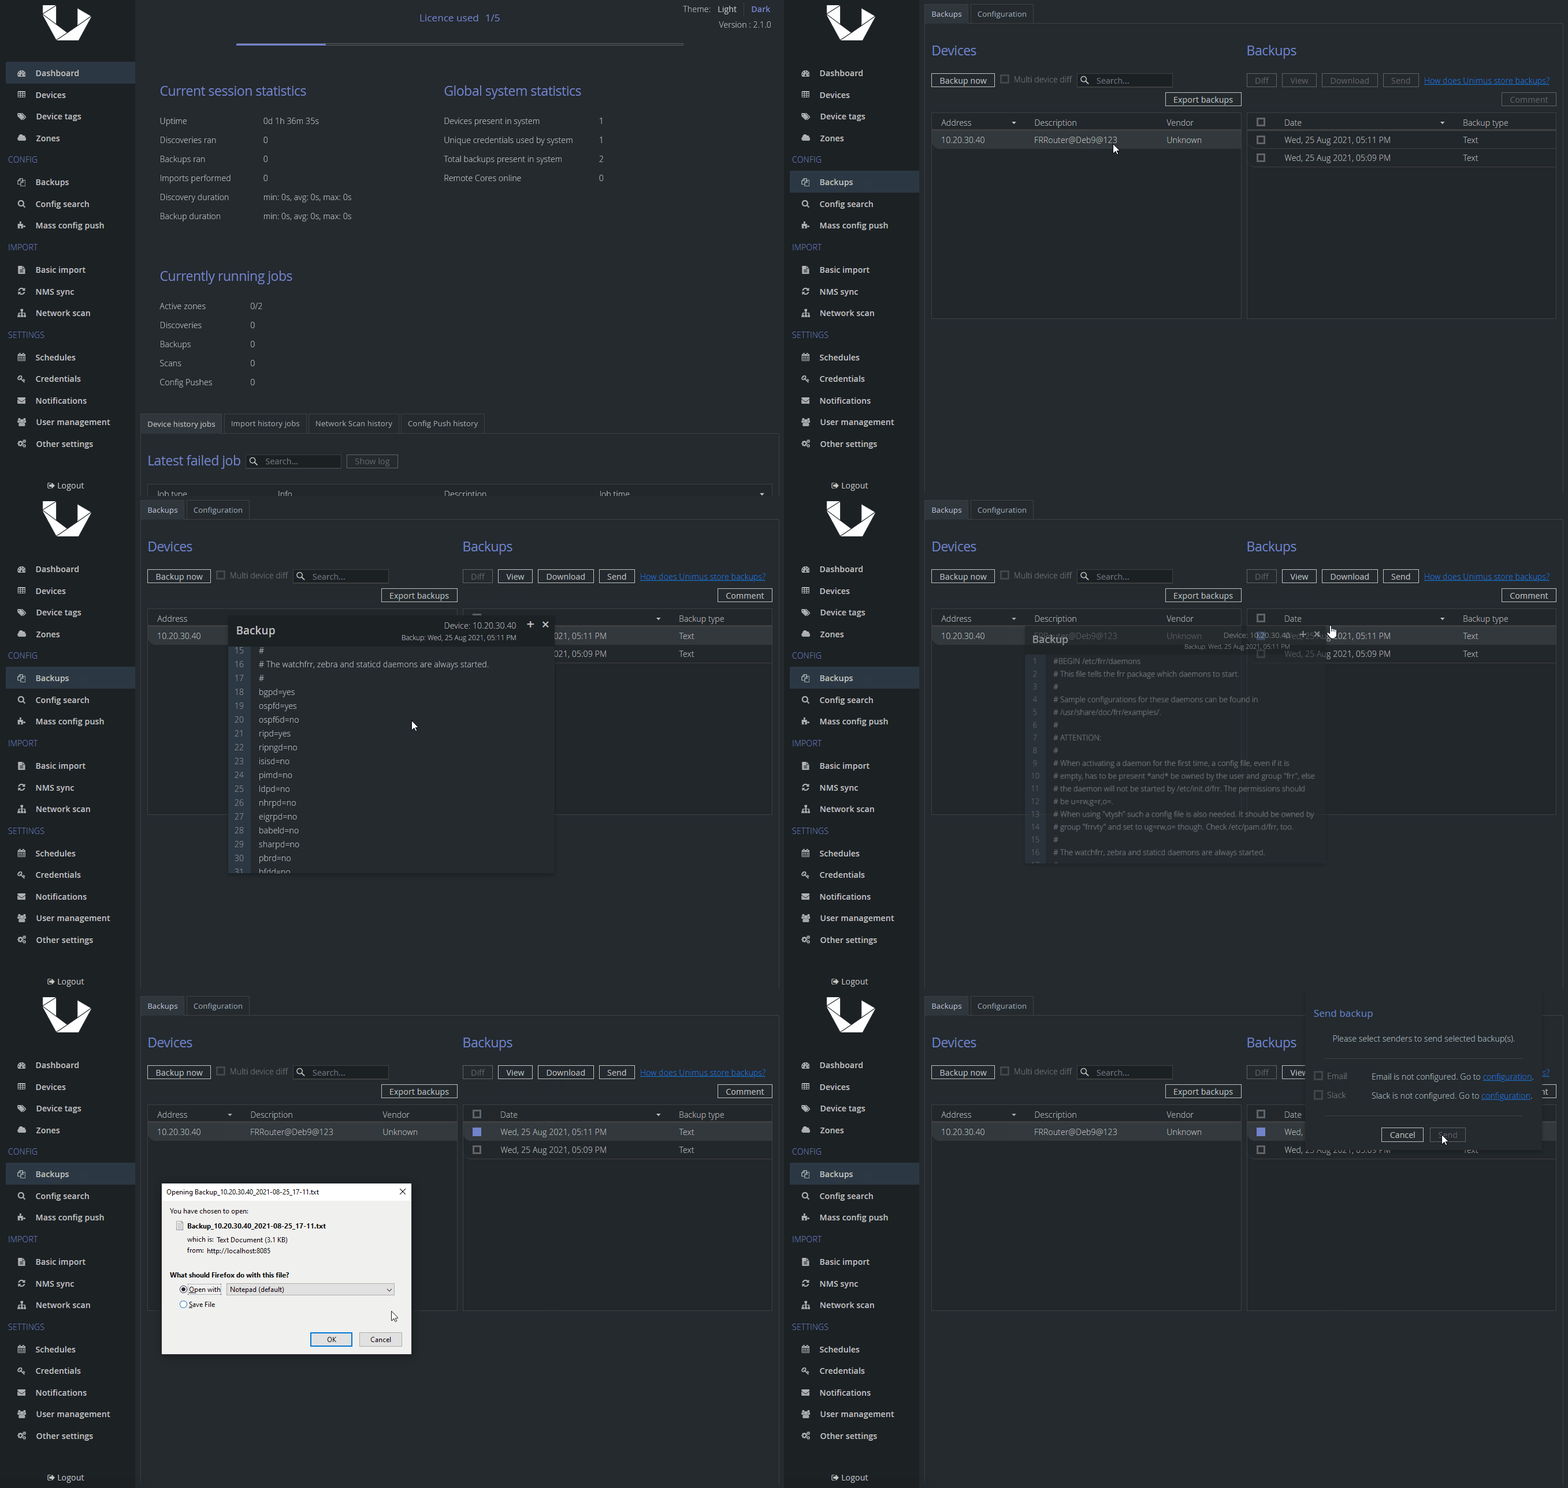
We properly see the content of this text file - Unimus automatically decodes it our BASE64 encoded string. We can download the backup, send it or check diffs in case something changes - just like any other backup.
Method 2 - BINARY backup
The second format of backup is in form of a binary file. Binary backups can be useful if your software generates has configuration files spread in multiple files across multiple formats so generating a single TXT file is not feasible. In such case packing all files into a single archive and uploading the archive is the way to go.
#!/bin/bash

cd /tmp

#BACKUP PREP
tar -czvf frrbackup.tar.gz -C /etc/frr/ daemons frr.conf

#BASE64 ENCODING
encodedbackup=$(base64 -w 0 frrbackup.tar.gz)

#BACKUP PUSH INTO UNIMUS
curl -H "Accept: application/json" -H "Content-type: application/json" -H "Authorization: Bearer \
eyJ0eXAiOiJKV1QiLCJhbGciOiJIUzI1NiJ9.eyJpc3MiOiJhdXRoMCJ9.ACruAhyEiipDrX7-QRsPfAJpsTooibm5RznqSHSMtuM" \
-d '{"backup":"'"$encodedbackup"'","type":"BINARY"}' "http://10.10.10.10:8085/api/v2/devices/234/backups"

#CLEANUP
rm frrbackup.tar.gz
Here is a breakdown of the workflow of this script:
- First it prepares and packs our target files into a single .tar.gz archive, but you can use other formats if you prefer different archiver/compressor.
- Then it is passed to a BASE64 encoder and loaded into a variable - this encoding is very important as it allows the binary file to be transferred as a single streamlined string of characters. Note, BASE64 encoding doesn't encrypt the content of your files, anyone could decode it with any BASE64 decoder.
- Then using the curl call from step 2 we fill in all parameters required with actual data, and change backup type to BINARY - note the use of extra single/double quotes to insert the variable containing our encoded backup, This format is important so that the variable is processed correctly.
- Lastly we clean up.
We can now run this script. Again we are expecting this output:
{"data":{"success":"true"}}If you don't see this output, it indicates there was a problem sending the backup. Refer to our API documentation to find more information if needed. Now, let's check Unimus and see if we got our backup and what we can do with it:
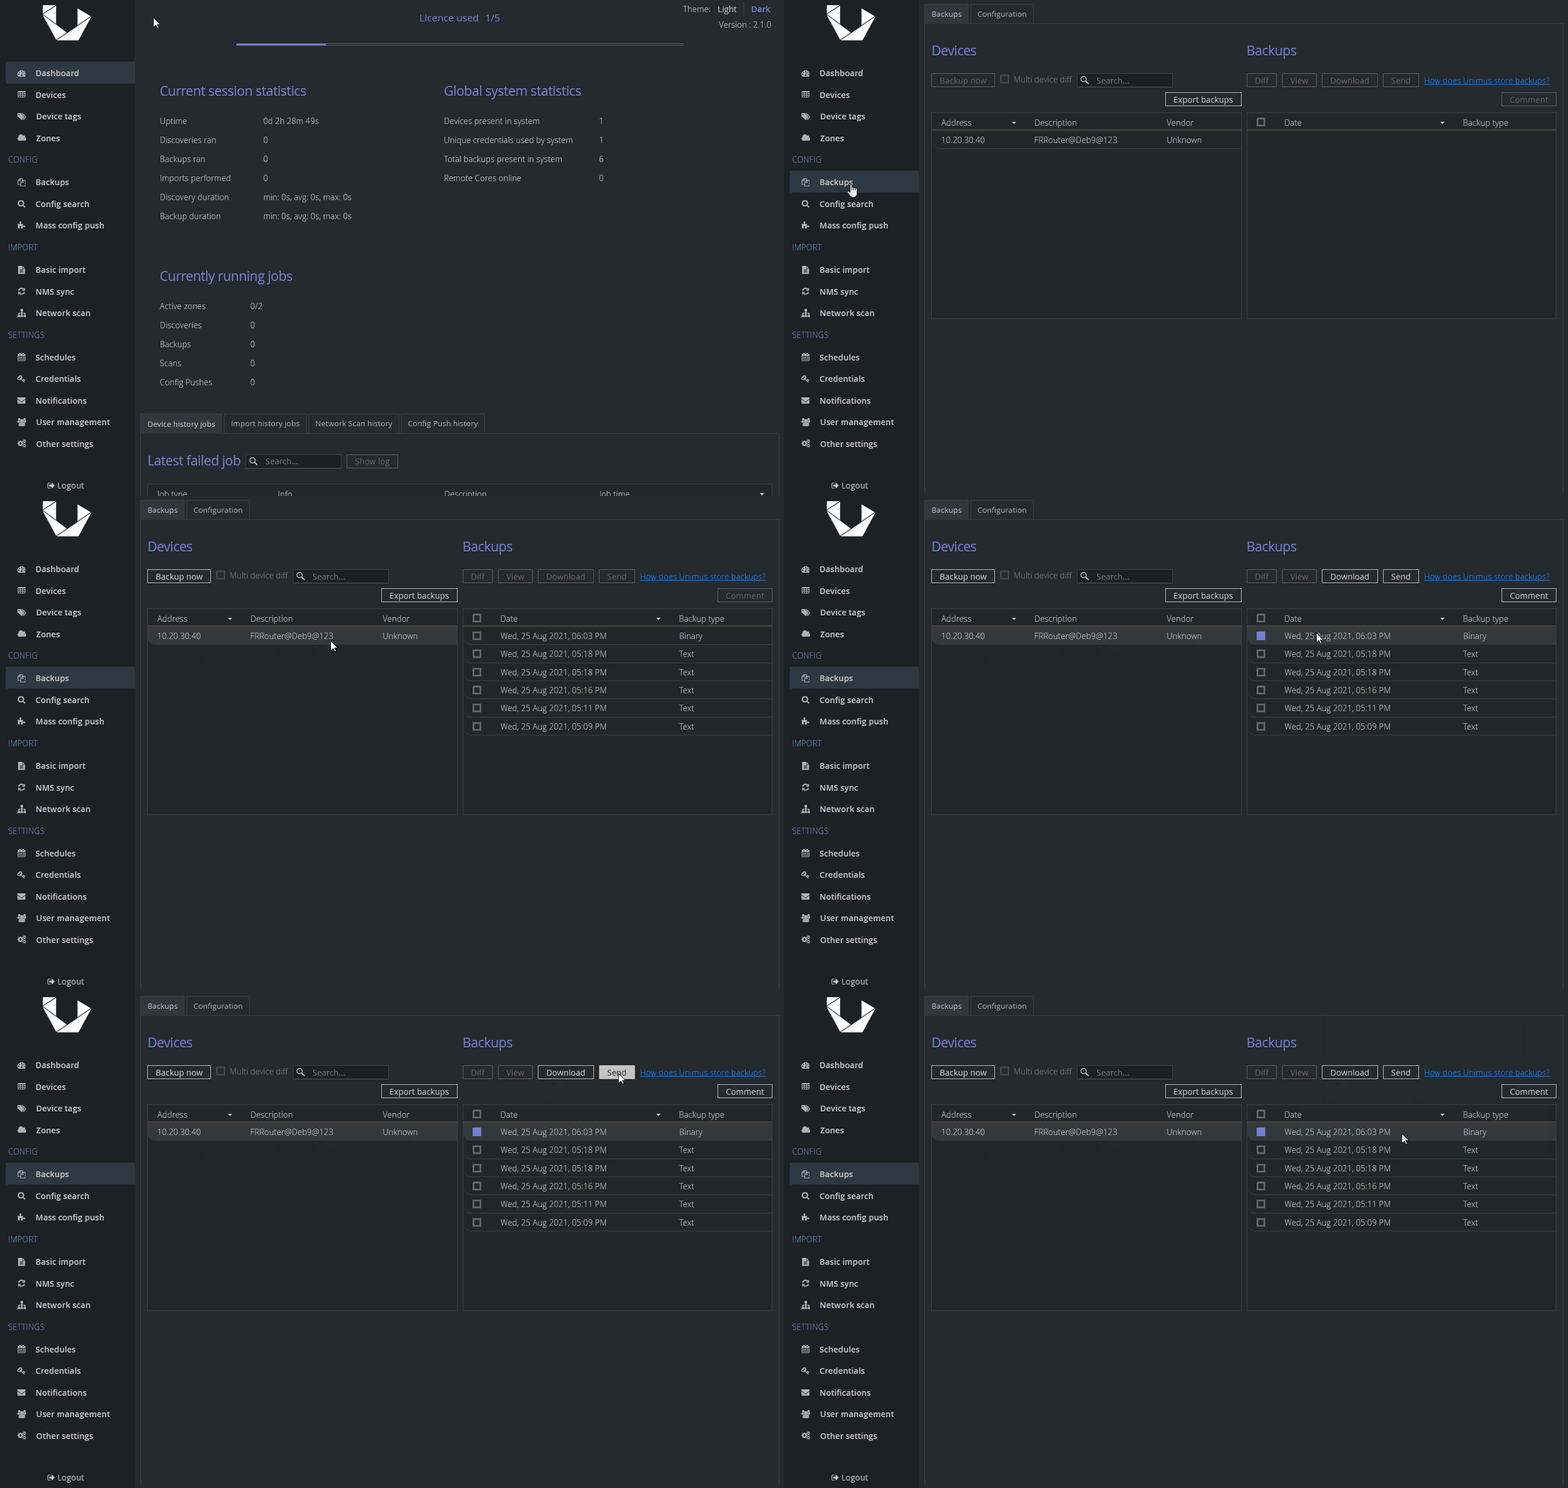
As you can see, Unimus received our backup, however compared to a text backup, we cannot see contents of this file and that is because it is a binary file and it could be in any format - .tar.gz, .bin, .zip, etc. We can still download or send it. If there is a change to this binary file we will see a difference in SHA1 sum. Note, when downloading a binary backup, Unimus will not append any extension to this file, we recommend renaming it right away.
STEP 4 - job scheduling
One-time execution of scripts is nice, however just as with any backup job, we want it to be run periodically. The last part of this article will be adding a scheduled job to Cron. Depending on your software and/or user privileges you have, you might need to change the way to set up a cron job, e.g. via user-specific jobs using "crontab -e". Since with our setup we need root privileges for accessing cron configuration files, we will add a job to /etc/crontab directly, and set our script to run every night at 3AM (just like our default schedule in Unimus).
0 3 * * * root /root/frrbackup.shAnd that's it! We have set up a device for FRR in Unimus, and created an automated way to generate and upload backups into Unimus.
Final words
We hope this article can serve as a template that can be used to upload any files / backups into Unimus. If you have any questions, or run into any issues using the examples in this article, please feel free to post in the Automation section of our Forums.
